
Styling a Shoot

As a starting note, a concept doesn’t need to be a full on story. Sometimes it’s just a vibe. For example, recently Mau Andres and I were discussing magazines to submit to for publication. IMIRAGE Magazine has an open submission for the theme “Something Blue” and I immediately put together a collection of blue focused images that were interesting for studio work. We shot some fire work on Monday with Miami makeup artist Jeniree Cardoza, so fingers crossed on seeing my face on their page soon!

Concept first, outfit second
I have Pinterest boards galore. From concepts to posing ideas, not to mention the non-photography related boards, I have nearly 100 different boards with over 6000 pins total. I get an idea in my head and just start compiling all of the images that fit my vision. Sometimes this is easier said than done. It can be difficult to find what you’re looking for, especially if it’s never been done before. Depending on the concept, I may pin examples of what to purchase, but I usually don’t worry too much about the actual styling until I have a photographer who is interested in shooting the concept. Once I have a yes, THEN I start looking into the styling. To start, I always see what I already have that can fit the concept. As a graduate student, I don’t have much of a budget for wardrobe and props. When I design a concept myself, I almost immediately know what will and will not work from my own wardrobe and then order what I’m missing. How much I spend on a supplementary piece depends on how important it is and how likely I am to use it for everyday life or another shoot. As an example, I compiled some images from my Blade Runner mood board and the final images. We ultimately ended up shooting the concept on a trip to Vegas. I already had the bodysuit from years prior, the skirt was from Sam's Miami visit, and the glasses (Amazon, $13) had been purchased for a shoot that never happened.


I believe I’ve mentioned before, that I don’t really book shoots unless there is some sort of vision or concept. While I find styling for my own concepts easy, I’m a little more panicked when it’s just a vibe or location given from the photographer. I typically ask a lot more questions regarding colors and patterns. And to be honest, half the styling work gets thrown on Sam as I declare I have nothing that will work. Yes, this happens even though I’ve been shooting for four years now. Perhaps it’s because I’ve been shooting for four years. It’s not that I have no clothes, but often I feel as though I’m reusing the same pieces over and over and they need something new to be refreshed. In my latest reel, I showed how to style a dress (albeit a new dress) four different ways, because I know how difficult it can be to be inspired. Don’t be afraid to get creative with accessories.
Outfit first, concept second
Sometimes you have an outfit that you just LOVE. You’re feeling yourself and you wanna do a photoshoot in it. I’ve been there! Especially when I was first building my portfolio, I focused a lot more on the clothes. For this method, I usually end up either shooting just on the streets or in the studio, with a solid background. Even with studio shoots, I like to have a good idea of the vibe we’re going for, not just “hey I like this outfit!”

In my opinion, this method is easier if you’re thrift shopping. When I have a concept in mind, I personally struggle to find pieces in thrift stores that fit my vision, especially if I already have a clear visualization of what I want to wear. If I imagine myself in a pale green bohemian maxi dress, I’m better off ordering that instead of praying I find my size in the exact style in one of the many Goodwill racks. If you’re just looking for a princessy dress, no matter the color, you’re bound to find one on the formal rack. You may find something you love and buy, not specifically for a shoot but you may incorporate it later. Like this pattern Forever 21 dress I found at Plato’s Closet. I styled it with a vintage fur hat, vintage leg warmers, and JustFab booties for a fall/winter look in Wisconsin.

Additional considerations
Location. This is a big one that I talk a bit about in an issue of Photos Unboxed magazine. I discussed my experience living and shooting in different cities, focusing mostly on a comparison between Chicago and Miami. If you want to read my thoughts in full, you can find that here, but I’ll give a short summary as well. In Chicago, my styling focused more on neutral and jewel tones, but the seasons allowed for a dynamic feed. In Miami, it’s more colorful, whether it be the walls in Wynwood or bright wardrobe statements. The biggest thing to remember is that each city has its own vibe and fashion atmosphere. What I would wear in Miami’s Art District is not something I would wear for a shoot on Chicago’s Riverwalk. Location influences styling and vice versa, as you’re not likely to stay in the exact spot for an entire shoot. Location also tied into the next two considerations.
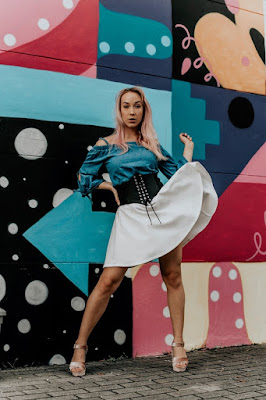 Colors. For mural walls, I like to either do a black/white outfit or accentuate a color from the painting. Complimentary colors (i.e. orange and blue, purple and yellow) are nice against solid painted walls and as accessory accents. Go for a bold color against black/white walls. A monochrome look can be a killer statement with the right location.
Textures and Patterns. Avoid bold prints for busy locations. Save lively patterned pieces for solid walls and studio space. Mixing prints is not my specialty but you can check out this short blog by Effortlessly Ricki to master that art. Contrasting your background with texture is definitely welcomed but I would recommend using only using one or two focal textures. For example, a lace top, pleather skirt, beaded bag, fur coat -- all beautiful pieces but a little much all together.
Confidence. Wear something you feel confident in! If you’re not comfortable, too self-conscious, etc, that will show on camera. Make sure you like how you look in an outfit before a photographer snaps a billion photos. There’s many times an outfit should work in theory but the fit isn’t quite right.
Weather. Weather in Miami is really only one of two conditions: hot and humid or raining. The temperature definitely dictates what you can and cannot wear. With that being said, Miami weather isn't the most conducive for fall clothing (sweaters, boots, scarves, etc). Plaid prints, leather, fringe, neutral and earth tones, and flowy fits are very in for Fall 2020 and can be easily incorporated into a more lightweight outfit. You definitely have to be more aware of what you would sweat in and how noticeable it would be.

When home for the holidays in Milwaukee, I have the opposite to consider: how to stay warm and not look bulky. Although I have a few shoots with a coat on, for the most part, I grin and bear the cold. You keep your coat on and stay warm for as long as possible, and then when the shot is set up, camera settings are perfect, you throw that coat and pretend the biting wind isn’t that bad. Finding indoor locations, whether it be a studio, an apartment/house, or a store, is ideal when it’s freezing out.


Comments
Post a Comment